Are you looking for a guide to migrate your WordPress website domain name? If the answer is “yes”, then you’ve come to the right place.
Migrating a WordPress domain name is not an overly common occurrence. However, there are many instances where a website might be required to change its domain name.
For example, your website might be penalized heavily by Google, and you want a new domain, or you might want to rebrand your business to a new name. Everything is fine until you have a proper reason to do so.
In this article, we will focus on the tools and techniques that will allow you to migrate WordPress website domain name. Before we start, however, let’s try to understand the impact of migrating your website domain on your SEO.
What is the impact of changing domain name on SEO?
One of the most common questions that a website owner has is: what will be the impact of moving the domain name on SEO?
As you might expect, Google will not respond quickly to the change in domain, and initially your search engine traffic will be impacted. With time and effort, however, your traffic will get back to normal after the switch.
To ensure that you get your traffic back, you need to follow a few simple steps. Don’t worry – we will go through them in this article. In short, you need to not only to buy a new domain, but also carry out proper 301 redirects to ensure that your SEO doesn’t get impacted any more than you can help.
Things to do before you start
Before we start, you need to do some pre-steps. These pre-steps will ensure that you don’t lose any of your work, and will also prepare the website for migration.
For the sake of an example, we will name the old site as “www.example.com” and the new site as the “www.newexample.com.” We will use these throughout the article for reference purposes.
How to migrate your WordPress website domain name
1. Creating a full backup
The first step is to always create a backup of your website, including files and database. As you are using WordPress, you will find a lot of backup plugins to do the task. We recommend using BackupBuddy, VaultPress, BackWPup or Duplicator. You can also use other backup plugins or services of your choice.
Last but not least, you can also back up your website using the Cpanel or use phpMyAdmin. Only try out these manual methods if you are sure what you are doing. For the most part, it’s a good idea to stick with backup plugins unless you’re 100% confident.
Once the backup is created, you can download it to your computer, or simply store it in the cloud.
2. Setting up the new site
To simplify things, we’ll use Duplicator as the example plugin for walking you through these steps.
To get started, you need to install the Duplicator plugin on your old site, www.example.com. Once done, you need to navigate to the plugin page from the WordPress side menu.
After you open the plugin, all you need to do is click on the “create” button to start the process of duplicating your website. After you provide the name of the package, it shouldn’t take more than 2-3 minutes for the backup to be complete.
Once done, you can download the package and secure it for the next step. For the sake of the tutorial, we will name the package “thekey.php”.
3. Connecting through FTP
The next step is to connect to your new site (www.newexample.com). You can use FileZilla to connect. After connection, just copy the the backup file, “thekey.php” into the root directory of the new website. You should be able to now access the website by typing the URL in your browser.
http://www.newexample.com/thekey.php
You need to change the URL and the file name accordingly for the above URL to work. Once done, you will now see a Duplicator Installer screen where it will ask for basic information such as the database.
Ensure that you check the “Table Removal” option and also ensure that the database on the new website is empty.
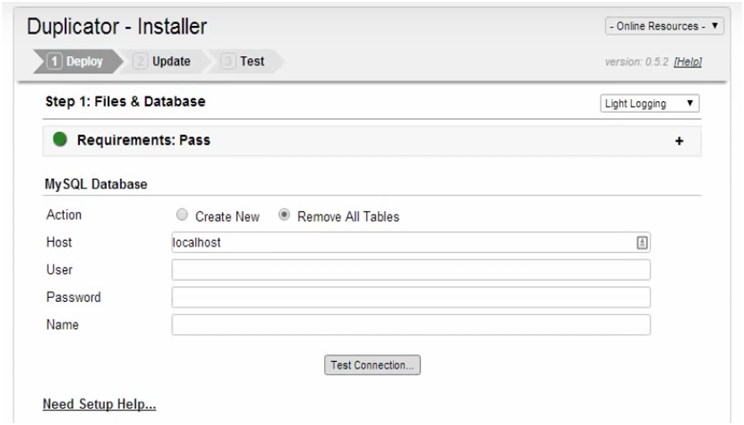
Next, you need to click on the “I have read all the warning and notices.” By clicking the “Run Deployment” option, the deployment process will now start.
After the initial installation process is completed, you will see another screen which is the “Update” screen. In this screen, you need to enter the old domain name and the new domain name. The plugin will try to guess the old and new URLs, but you should double-check to ensure that both values are correct.

The final step is to wait for the process to complete. After the completion, you can now log in to the WordPress admin panel using the old credentials and check if everything is working fine. The plugin also tries to prompt you to create a new backup which you should consider that you can always revert to the first instance if something goes wrong from here onwards.
You can also delete the installer file and clear your directory for any unnecessary files. You also need to re-initiate the permalinks by going to “Settings” -> “Permalinks.”
4. Final step: Implementing 301 redirects and notifying Google
With all the backups loaded into the new website, it is now time to tell Google that your new site is ready. To do so, you need to set up permanent 301 redirects using a simple .htaccess file hack. This hack is also used when switching a website from HTTP to HTTPS in WordPress.
You can find the .htaccess file in your wp-admin or wp-includes folder. It is a hidden file, and you might to search for hidden files if you are not able to locate it. After you locate the file, copy and paste the below code to make the magic happen.
#Options +FollowSymLinks

RewriteEngine on

RewriteRule ^(.*)$ http://www.newexample.COM/$1 [R=301,L]
Don’t forget to replace newexample with your new domain name.
With redirection complete, it is now time to tell Google about your new domain.
You need to use Google Search Console to let Google know about the change. Go to the left-hand menu and click on “Change of Address.” You can follow this simple guide by Google for step-by-step instructions.
Conclusion
Migration a website domain name is not a simple task. You need to carry out the steps with caution and concentration.
We hope you found this guide useful. If you are not sure how to proceed with the whole process, it is always advisable to hire a professional to do it for you. Also, don’t forget to share your opinions in the comments section below.
Lucy is an experienced Web Developer and passionate blogger, currently working at WPCodingDev.
Leave a Reply
You must be logged in to post a comment.