There are many ways to make your articles easier to read on the web – lots of paragraph breaks, short snappy sentences, headings, sub-headings, Gifs of Kanye West’s mood swings – but one of the key ways to make your content look attractive is by using lots of lovely images.
And the best thing about images, is that they can be used to bring in organic traffic via search engine image results.
But in order for this to happen, they need to be optimised accordingly.
Here’s a guide to make you aware of the key things you need to be doing when it comes to uploading images to your site, which a surprising number of people often ignore.
Choosing images
It’s important to use images related to the text of the article. This is mainly from a user experience point of you, as you don’t want to baffle people with an obtuse choice of image.
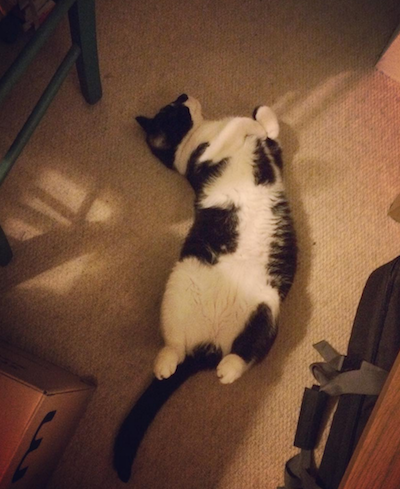
Cute, for sure, but Otis doesn’t belong here (although try telling him that).
Your images need to be of a good quality, in the correct aspect ration, with good resolution and of a size large enough to be visible across devices.
Another thing to consider is your use of ‘stock-photos’.
We introduced a strict ‘no stock photos allowed’ policy when I took up the position as Editor of SEW. Stock photos are the worst. They make your website look like a marketing brochure for a characterless business that ‘leverages thought-leadership into hot leads’ or some such rubbish. They’re also hackneyed, over-used and cheesy as hell.
And expensive.
Be really careful, even if you think an image is copyright free, the original owner could still be Getty, or Shutterstock, and you may find yourself presented with a £500 invoice months down the line.
I’ve made this mistake before when I used an image of Justin Timberlake that had already been memed to death and I therefore assumed it was ‘fair usage’. I was wrong.
It’s also very difficult right now to give you an example of a stock photo without incurring a fee so I’ll just show you one we have paid for in the past.

Look at those Millennials. They’re just like you and me right?
Stop paying for stock photos. Instead pay for your own photographer to take images for you, or get out there and do it yourself.
You should also be creating your own graphs, charts and visual designs too.
But if you don’t have the time or resources to do that – and frankly who does? – there are plenty of free and easy-to-use resources out there…
Free image resources
Google image search – usage rights
When you search for an image, you can filter out the results that are copyrighted. Just click on Search Tools, then Usage Rights and select Labeled for Reuse.

You won’t always strike gold here, but there may be something interesting that nobody else has used before.
Flickr Creative Commons
Flickr is an awesome resource for photos, and you can use any that are labelled with a Creative Commons licence.
It’s an alternative to full copyright, you just have to make sure you give full credit and link to the Flickr profile of the person who took the photo.
Be careful when you use Flickr Creative Commons, as there are various licences available, for instance some photographers only allow their images to be used for non-commercial purposes.
Unsplash
One of my favourites, Unsplash images are all copyright free, you just need to credit and link to the photographer. Occasionally they border on ‘stock photo’ but they are all of a much higher quality than your standard ‘model looking at iPhone and smiling’ images.
Other handy tools
Gif grabber
Available for the Mac, Gif Grabber is the best way to make so many wonderful Gifs for free. You can capture anything within your desktop or laptop screen, and resize and trim the finished product.
Awesome screenshot
This is a Chrome extension that allows you to take screenshots of your browser window (either partial or the whole web page) very easily, and you can also annotate before downloading it to your browser.
Piktochart
One of the most popular data visualisation tools, Piktochart is free, simple to use and has loads of great templates for infographics and other creatives.
I made the following Gif of how to use Piktochart using Gif Grabber…

Optimising images for search
Once you’ve found or created your desired image. You’re then ready to upload to your site.
Image size
You’ll definitely want to resize your photo so it’s not such a massive file. It’s very easy to overlook the fact that most iPhone photos can be in excess of 3,000 pixels wide (which can be 2,500 pixels bigger than you really need).
Huge image files can drag the page-load time of your site down and directly affect your rankings on search engines, so be sure to resize them before you upload.
If you’re using a Mac, it’s easy to resize, just open the picture, navigate to Tools then select Adjust Size.

You can also use Photoshop if you have it, or you can use one of many online resizing tools, such as Picresize.
Alternatively if you’re on a PC, you can use Paint.
Yep, good old MS Paint. Just open up Paint, then click Open, choose the picture you want to resize and open it. Then on the Home tab, under Image group, click Resize.
Warning about using iPhone images
If you are uploading iPhone pictures to a WordPress site there is a bug that can become very annoying. When you’ve taken a picture of something with your iPhone in portrait, it can appear as landscape once your article is live. It doesn’t happen for everyone and it depends on what generation iPhone you use and your WordPress template.
You can avoid this by only taking photos in landscape (with the volume button facing down) or there are various fixes available in this forum topic.
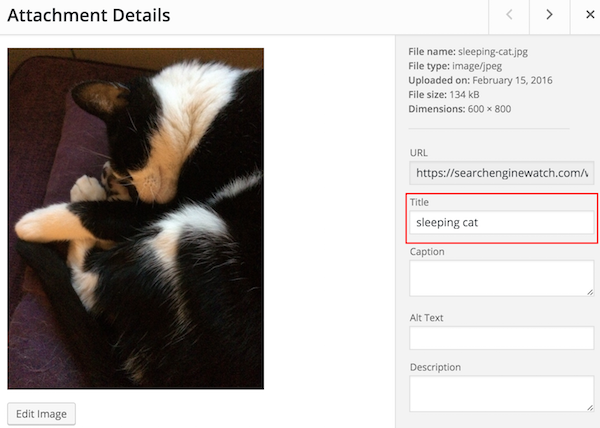
File/Title name
Before you upload the image to your site, make sure you give it an accurate file name.
Again to use the iPhone photo example, these tend to be called something generic like IMG_6056. So do yourself a favour and rename it, this won’t necessarily help your SEO, but it will help if you ever need to search for it in the back-end of your site.
In WordPress and other sites, the image’s file name will automatically be used as its title.
So not this…

But this…
Alt-text
Most important of all is how you describe your image in the Alt section (can be known as Alt-tags or Alt-text). Google can’t ‘see’ your images, but it can ‘read’ them and what it reads is what you write in the alt-attribute.
Alt-text should be clear, descriptive, concise and not stuffed with keywords. Alt-text is also what’s used by screen reader software to describe images to people with visual impairments.
In fact the one rule I always use when it comes to alt-text is write as if you’re describing it to a person with a visual impairment. So the above example I would write ‘black and white cat asleep on a purple pillow’.
The alt-text is also what shows up in the text box that appears when you hover over an image.
Description & Caption
In WordPress you will also see fields for Description and Caption. These don’t necessarily add any SEO value to your images, but they can be useful for other reasons.
The Description can be used to add a lot more extra detail, such as how the picture was taken, when it was taken and any other interesting elements.
The Caption will show up underneath the image on the live article. It’s up to you whether you use one or not. It can be helpful to describe or comment on the image.
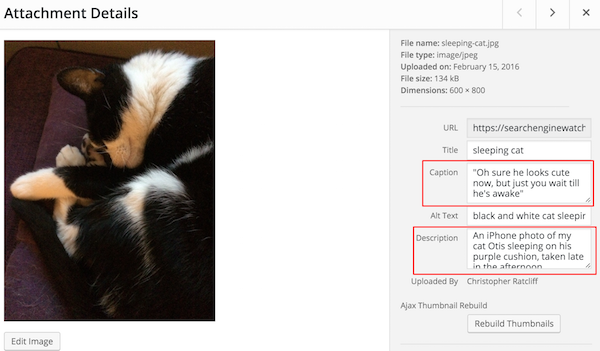
Image reclamation
Occasionally you may feel the need to check that your own self-created images aren’t being rampantly used throughout the internet without proper credit.
You can do this by using an automated reverse search tool, such as Image Raider.
Just add your images to the catalogue, then it will alert you any time another site uses your image. If that site hasn’t given you proper credit, you can get in touch and ask them to do so.
You don’t have to be an intimidating jerk about it though, as it was probably done by accident.
Leave a Reply
You must be logged in to post a comment.