How to add Schema.org markup to your email marketing
If you’ve ever used Schema.org to mark up your webpages, you’ll know it’s a great way to help search engines interpret your content and create more relevant, rich and attractive search results.
If you’ve ever used Schema.org to mark up your webpages, you’ll know it’s a great way to help search engines interpret your content and create more relevant, rich and attractive search results.
If you’ve ever used Schema.org to mark up your webpages, you’ll know it’s a great way to help search engines interpret your content and create more relevant, rich and attractive search results.
But its uses don’t begin and end with webpages.
In this guide, I’ll look at some of the handy things you can do with email markup. This will include adding quick actions to your emails, triggering Google Now cards and enriching your users’ search results with information from their inbox.
I will also show how you can get started with adding simple markup to your emails.
If you haven’t encountered Schema.org structured data vocabulary before, or aren’t too clear on what it does, in short: Schema.org is the result of a collaboration between Google, Microsoft, Yandex and Yahoo to create a universal ‘language’, or markup, that any search engine can understand.
It takes the form of code that you add to your webpage to label and identify different elements like images, names, addresses, recipes, ratings and much more.
This helps search engines to ‘read’ your content and pull more relevant information, as well as rich data, into search results. But aside from webpages, you can also add Schema.org markup to emails, and use it to create Rich Pins on Pinterest for increased engagement.
Schema.org for emails is a Google initiative, and so far the functionality is only available to Gmail accounts.
Google says that it “has worked with the schema.org community to standardise its mail-related schemas so that other email services and email clients can also take full advantage of them”, but this seems to still be a work in progress.
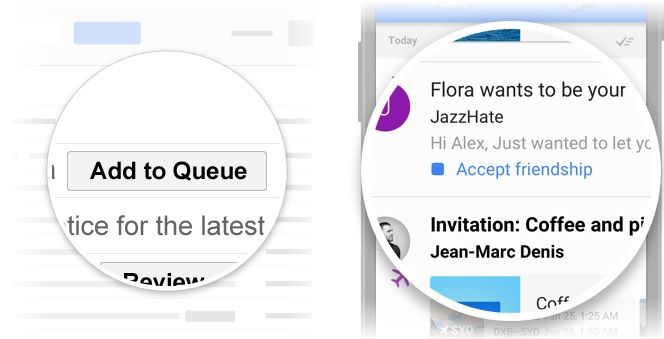
One-click actions in Gmail and Inbox for Gmail | Source: Google Developers
For marketers, the goal is always to entice users into opening and engaging with their emails. But email open rates average around 22% (according to MailChimp), with a click-through rate of just under 3%.
What if you could put calls to action – like “RSVP”, “Complete purchase” or “Confirm subscription” – directly in the email subject line?
You can add Schema.org markup to your emails which will let you do just that.
Email confirmations for events, flight details, hotel reservations and so on which use Schema.org markup will also be added automatically to the recipient’s Google Calendar.
You can mark up emails to appear as answer cards in Google searches, which will put details from your email right at the top of search when they search for relevant information.
Email markup can also trigger Google Now cards to deliver updates about your products and services to customers.
Before you can get started using Schema.org in your emails, there are a few hoops you need to jump through.
First, you’ll need to be registered with Google. This is a multi-step process aimed at making sure that the emails you’ll be sending out are secure and not spam.
You’ll have to meet a series of quality guidelines, including authenticating your emails via SPF or DKIM, making sure your emails come from a static email address, and following the Gmail Bulk Sender Guidelines.
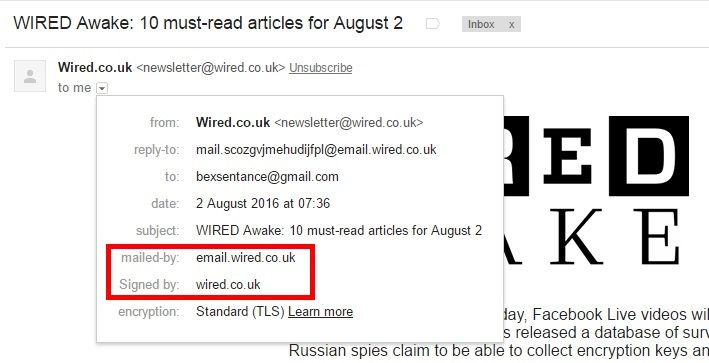
A Gmail message is authenticated if you see “mailed-by” with the domain name, and “Signed by” with the sending domain
You should also have a very low rate of spam complaints from users, along with a “consistent history of sending a high volume of mail from your domain”, which Gmail qualifies as sending a minimum of 100 emails per day for at least a few weeks.
You might think that sending your users a hundred emails per day is the quickest way to start getting spam complaints, especially if you’re a small business. But remember that sending emails from your domain doesn’t just mean newsletters; notifications, receipts and confirmation emails all count towards your total.
You can start testing the waters of email markup even while you’re still going through the registration process, as long as you send any test emails to yourself.
Any emails where the sender and recipient are the same ignore the registration requirements, and so can be used for self-testing. This means you can try out your markup and see how well it works before you commit yourself to a lengthy registration.
If you’ve used Schema.org with webpages, you’ll know that there are several different formats you can use to add the markup to your website, including Microdata, RDFa and JSON-LD. With email markup, there are two: Microdata and JSON-LD.
Normally, one of the main differences between Microdata and JSON-LD formatting is that Microdata is added inline (where the code goes around the page elements being marked up, the images and names and places themselves) whereas JSON-LD is confined to the header, meaning you can mark up things which aren’t necessarily present in your content, and also keep your content and your markup nice and separate.
With email schemas, however, it’s possible to write all of your Microdata markup in the head of your email, and I personally recommend using this method for two reasons…
One, all of the up-to-date examples on Google Developers use Microdata in the header, and the only inline example is several years old. So if you want to write the code yourself using Google Developers as a reference point, you really need to use header markup.
And two, Google’s Email Markup Tester seems to prefer it, which is helpful when you want to check for errors. If you’re absolutely dying to use inline markup, I’ve included an example of what that might look like at the end of the section on Microdata.
Let’s say we want to send out an email confirming a customer’s ticket registration for our Shift San Francisco event on 30th August. The HTML for our email might look something like this:
<html>

<body>

<p>

Dear Andrea, thanks for booking your ticket to Shift San Francisco. Please find below a confirmation of your order details.

</p>

<p>

BOOKING DETAILS<br/>

Order for: Andrea Ellenby<br/>

Event: Shift San Francisco<br/>

When: August 30th 2016 8:00am PST<br/>

Venue: Park Central Hotel, 50 Third Street, San Francisco, CA 94103, US<br/>

Reservation number: SF12345<br/>

</p>

</body>

</html>
In between the <body> tag and the <p> paragraph tag below it is where we’re going to add our Schema.org markup. All of the tags we can use for an event reservation email are listed on the Event Reservation page on Google Developers.
Ours is a very simple email, so we’ll only need a few of them. Mainly, we need to identify who the reservation is for, the reservation number and status (confirmed), and the details of the event: what it is, when and where.
First, we’re going to put in a <div> tag identifying our email type as an event reservation. This uses the tags itemscope and itemtype: itemscope basically specifies that the email is about a thing, and itemtype identifies what that thing is.
With Microdata, item types are given as URLs, in this case http://schema.org/EventReservation. So our first line will be:
<div itemscope itemtype="http://schema.org/EventReservation">
Next we’re going to use a <meta> tag to specify our customer’s reservation number for the event. This tag has two halves: itemprop is used to label the individual “sub-items” within an item type, and we’ll be using it to tag most of the data in our email. The second half of our tag, content, gives the details.
<meta itemprop="reservationNumber" content="SF12345"/>
Essentially, the itemprop is saying “this is a reservation number” and the content tag is saying “this is what the reservation number is.”
Our customer’s reservation status needs to be specified using a URL, which takes a <link> tag:
<link itemprop="reservationStatus" href="http://schema.org/Confirmed"/>
For the rest of the markup, we can basically repeat the structure of the first two lines: a <div> tag at the beginning of each section, followed by meta tags to mark up the components.
Our finished code should look like this:
<html>

<body>

<div itemscope itemtype="http://schema.org/EventReservation">

<meta itemprop="reservationNumber" content="SF12345"/>

<link itemprop="reservationStatus" href="http://schema.org/Confirmed"/>

<div itemprop="underName" itemscope itemtype="http://schema.org/Person">

<meta itemprop="name" content="Andrea Ellenby"/>

</div>

<div itemprop="reservationFor" itemscope itemtype="http://schema.org/Event">

<meta itemprop="name" content="Shift San Francisco"/>

<meta itemprop="startDate" content="2016-08-30T08:00:00-08:00"/>

<div itemprop="location" itemscope itemtype="http://schema.org/Place">

<meta itemprop="name" content="Park Central Hotel"/>

<div itemprop="address" itemscope itemtype="http://schema.org/PostalAddress">

<meta itemprop="streetAddress" content="50 Third Street"/>

<meta itemprop="addressLocality" content="San Francisco"/>

<meta itemprop="addressRegion" content="CA"/>

<meta itemprop="postalCode" content="94107"/>

<meta itemprop="addressCountry" content="US"/>

</div>

</div>

</div>

</div>

<p>Dear Andrea, thanks for booking your ticket to Shift San Francisco. Please find below a confirmation of your order details.

</p>

<p>

BOOKING DETAILS<br/>

Order for: Andrea Ellenby<br/>

Event: Shift San Francisco<br/>

When: August 30th 2016 8:00am PST<br/>

Venue: Park Central Hotel, 50 Third Street, San Francisco, CA 94103, US<br/>

Reservation number: SF12345<br/>

</p>

</body>

</html>
You might be wondering about the time-stamp on the start date, “2016-08-30T08:00:00-08:00.” As far as I can tell, when writing start times for an event using Microdata formatting, you have to specify the timezone in UTC. So because our event is in San Francisco, UTC-8, our 8am start time is written as 08:00:00-08:00. If it were a 9am start in UTC+7, it would become 09:00:00+07:00, and so on.
As I mentioned earlier, Google’s Email Markup Tester is really helpful when you want to check your code for errors or things you might have missed. It will often flag up a series of “recommended properties” which it thinks you ought to have, but you can ignore them if they don’t apply to your email.
Google’s Structured Data Markup Helper also has an ‘email’ function which can do the hard work of tagging for you – all you need to do is highlight the relevant part of your content and select the right item type from a drop-down menu.

However, it’s worth bearing in mind that the markup helper uses inline microdata, and there are a few elements which Google’s Email Markup Tester considers to be ‘required’ properties that might not necessarily be present in your content. For instance, in our example email there’s nowhere to add reservation status inline, but as it’s a required element, we’d still need to add it in the header.
An inline markup version of our email might look something like this:
<html>

<div itemscope itemtype="http://schema.org/EventReservation">

<link itemprop="reservationStatus" href="http://schema.org/Confirmed"/>

<head>

</head><body>

<p>

Dear Andrea, thanks for booking your ticket to Shift San Francisco. Please find below a confirmation of your order details.

</p>

<p>BOOKING DETAILS<br/>

Order for:

<span itemprop="underName" itemscope itemtype="http://schema.org/Person">

<span itemprop="name">Andrea Ellenby</span></span><br/>

Event:

<span itemprop="reservationFor" itemscope itemtype="http://schema.org/Event">

<span itemprop="name">Shift San Francisco</span><br/>

When:

<span itemprop="startDate" content="2016-08-30T08:00">August 30th 2016 8:00am PST</span><br/>

Venue:

<span itemprop="location" itemscope itemtype="http://schema.org/Place">

<span itemprop="name">Park Central Hotel</span>,

<span itemprop="address" itemscope itemtype="http://schema.org/PostalAddress">

<span itemprop="streetAddress">50 Third Street</span>,

<span itemprop="addressLocality">San Francisco</span>,

<span itemprop="addressRegion">CA</span>

<span itemprop="postalCode">94103</span>,

<span itemprop="addressCountry">US</span></span></span></span><br/>

Reservation number:

<span itemprop="reservationNumber">SF12345</span><br/>

</p>

</body></html>
JSON-LD is a web standard and W3C recommendation which was added as a Schema.org formatting in 2013. Google also recommends to developers that they use JSON-LD when writing Schema.org markup.
Its main advantage is that it confines your markup to the header, meaning that a) you can keep extra tags out of the body of your email, and b) you aren’t restricted to only marking up elements that appear in the email content.
JSON-LD notation is contained inside a script block (<script></script>) and a pair of curly brackets, also called curly braces. So to start off our code and signal that we’re using JSON-LD format, we would input:
<script type="application/ld+json">

{
At the end, to close these, we’ll add another } and close the script tag with </script>.
Next, we need to use the keyword @context to signal that we’re using Schema.org vocabulary to mark up our email. Each line of code should also have a comma at the end of it, as follows:
"@context": "http://schema.org",
The keyword @type defines the type of email we’re marking up, so an event reservation. This is equivalent to the itemtype tag in Microdata.
"@type": "EventReservation",
Unlike Microdata, there’s no keyword that defines item ‘sub-types’ or properties like the itemprop tag does. Instead, they just go on a separate line underneath, like so:
"@type": "EventReservation",

"reservationNumber": "SF12345",

"reservationStatus": "http://schema.org/Confirmed",
If our ‘sub-types’ have further attributes that we need to mark up, then we can enclose those in another pair of curly braces. This kind of code structure is known as an object structure. So when marking up our customer’s name details for the reservation, we can write it like this:
"underName": {

"@type": "Person",

"name": "Andrea Ellenby"

},
We can write the rest of our markup this way, putting each attribute on a new line and containing any ‘sub-properties’ within curly braces. Our finished markup should look like this:
<script type="application/ld+json">

{

"@context": "http://schema.org",

"@type": "EventReservation",

"reservationNumber": "SF12345",

"reservationStatus": "http://schema.org/Confirmed",

"underName": {

"@type": "Person",

"name": "Andrea Ellenby"

},

"reservationFor": {

"@type": "Event",

"name": "Shift San Francisco",

"startDate": "2016-08-30T08:00:00-08:00",

"location": {

"@type": "Place",

"name": "Park Central Hotel",

"address": {

"@type": "PostalAddress",

"streetAddress": "50 Third Avenue",

"addressLocality": "San Francisco",

"addressRegion": "CA",

"postalCode": "94107",

"addressCountry": "US"

}

}

}

}

</script>
Google’s Email Markup Tester is really helpful when you want to check your code for errors or things you might have missed. It will often flag up a series of “recommended properties” which it thinks you ought to have, but you can ignore them if they don’t apply to your email.
Once you’ve mastered the basics of email markup and sent a few test emails, you’ll have a good foundation in place to move onto more advanced forms of markup like email actions, enriching search results and triggering Google Now cards.
In the next instalment of our beginner’s guides to Schema.org, I’ll be looking at how to mark up email actions with Schema.org, from one-click actions to RSVPs, reviews and go-to actions. Stay tuned!
Leave a Reply
You must be logged in to post a comment.